How to Add an AI Chatbot to Your Website in 2025 - With WebsiteChat
Zero-code, tailored knowledge training with complete customization and smart analytics.

Chatbots have come a long way by 2025. The flash arrival of ChatGPT at the end of 2022 sparked an explosion of AI advancements, making modern chatbots far more capable and easier to implement. Today, they’re everywhere – more than two-thirds of consumers have interacted with a chatbot in the last year alone. Businesses are embracing AI chat assistants not just because they’re trendy, but because they deliver real results. By automating answers to common questions, chatbots can save companies around 30% on customer support costs. They also provide 24/7 service, instantly answering inquiries and capturing leads even after business hours. In fact, 64% of customers say round-the-clock availability is the best thing about using a chatbot – no one likes waiting until the next day for help!
Despite these benefits, many website owners still aren’t sure how to add an AI chatbot to their website. It might sound technical, but here’s the good news: you don’t need to write a single line of code. In 2025, no-code AI chatbot builders (like WebsiteChat) make it effortless for anyone to create and deploy a smart chat assistant. In this step-by-step tutorial, we’ll show you exactly how to do it – from creating your bot and training it on your content, to customizing its look and embedding it on your site. We’ll also cover how to configure important settings and how to monitor your chatbot’s performance once it’s live.
Ready to give your website an interactive upgrade? Let’s dive into this website chatbot tutorial and get your AI assistant up and running!
Step 1: Create Your AI Chatbot and Train It on Your Content
The first step is to create your chatbot. Sign up for an AI chatbot service of your choice – for this guide, we’ll illustrate using WebsiteChat, our tool that lets you build an AI assistant by training it on your own content.
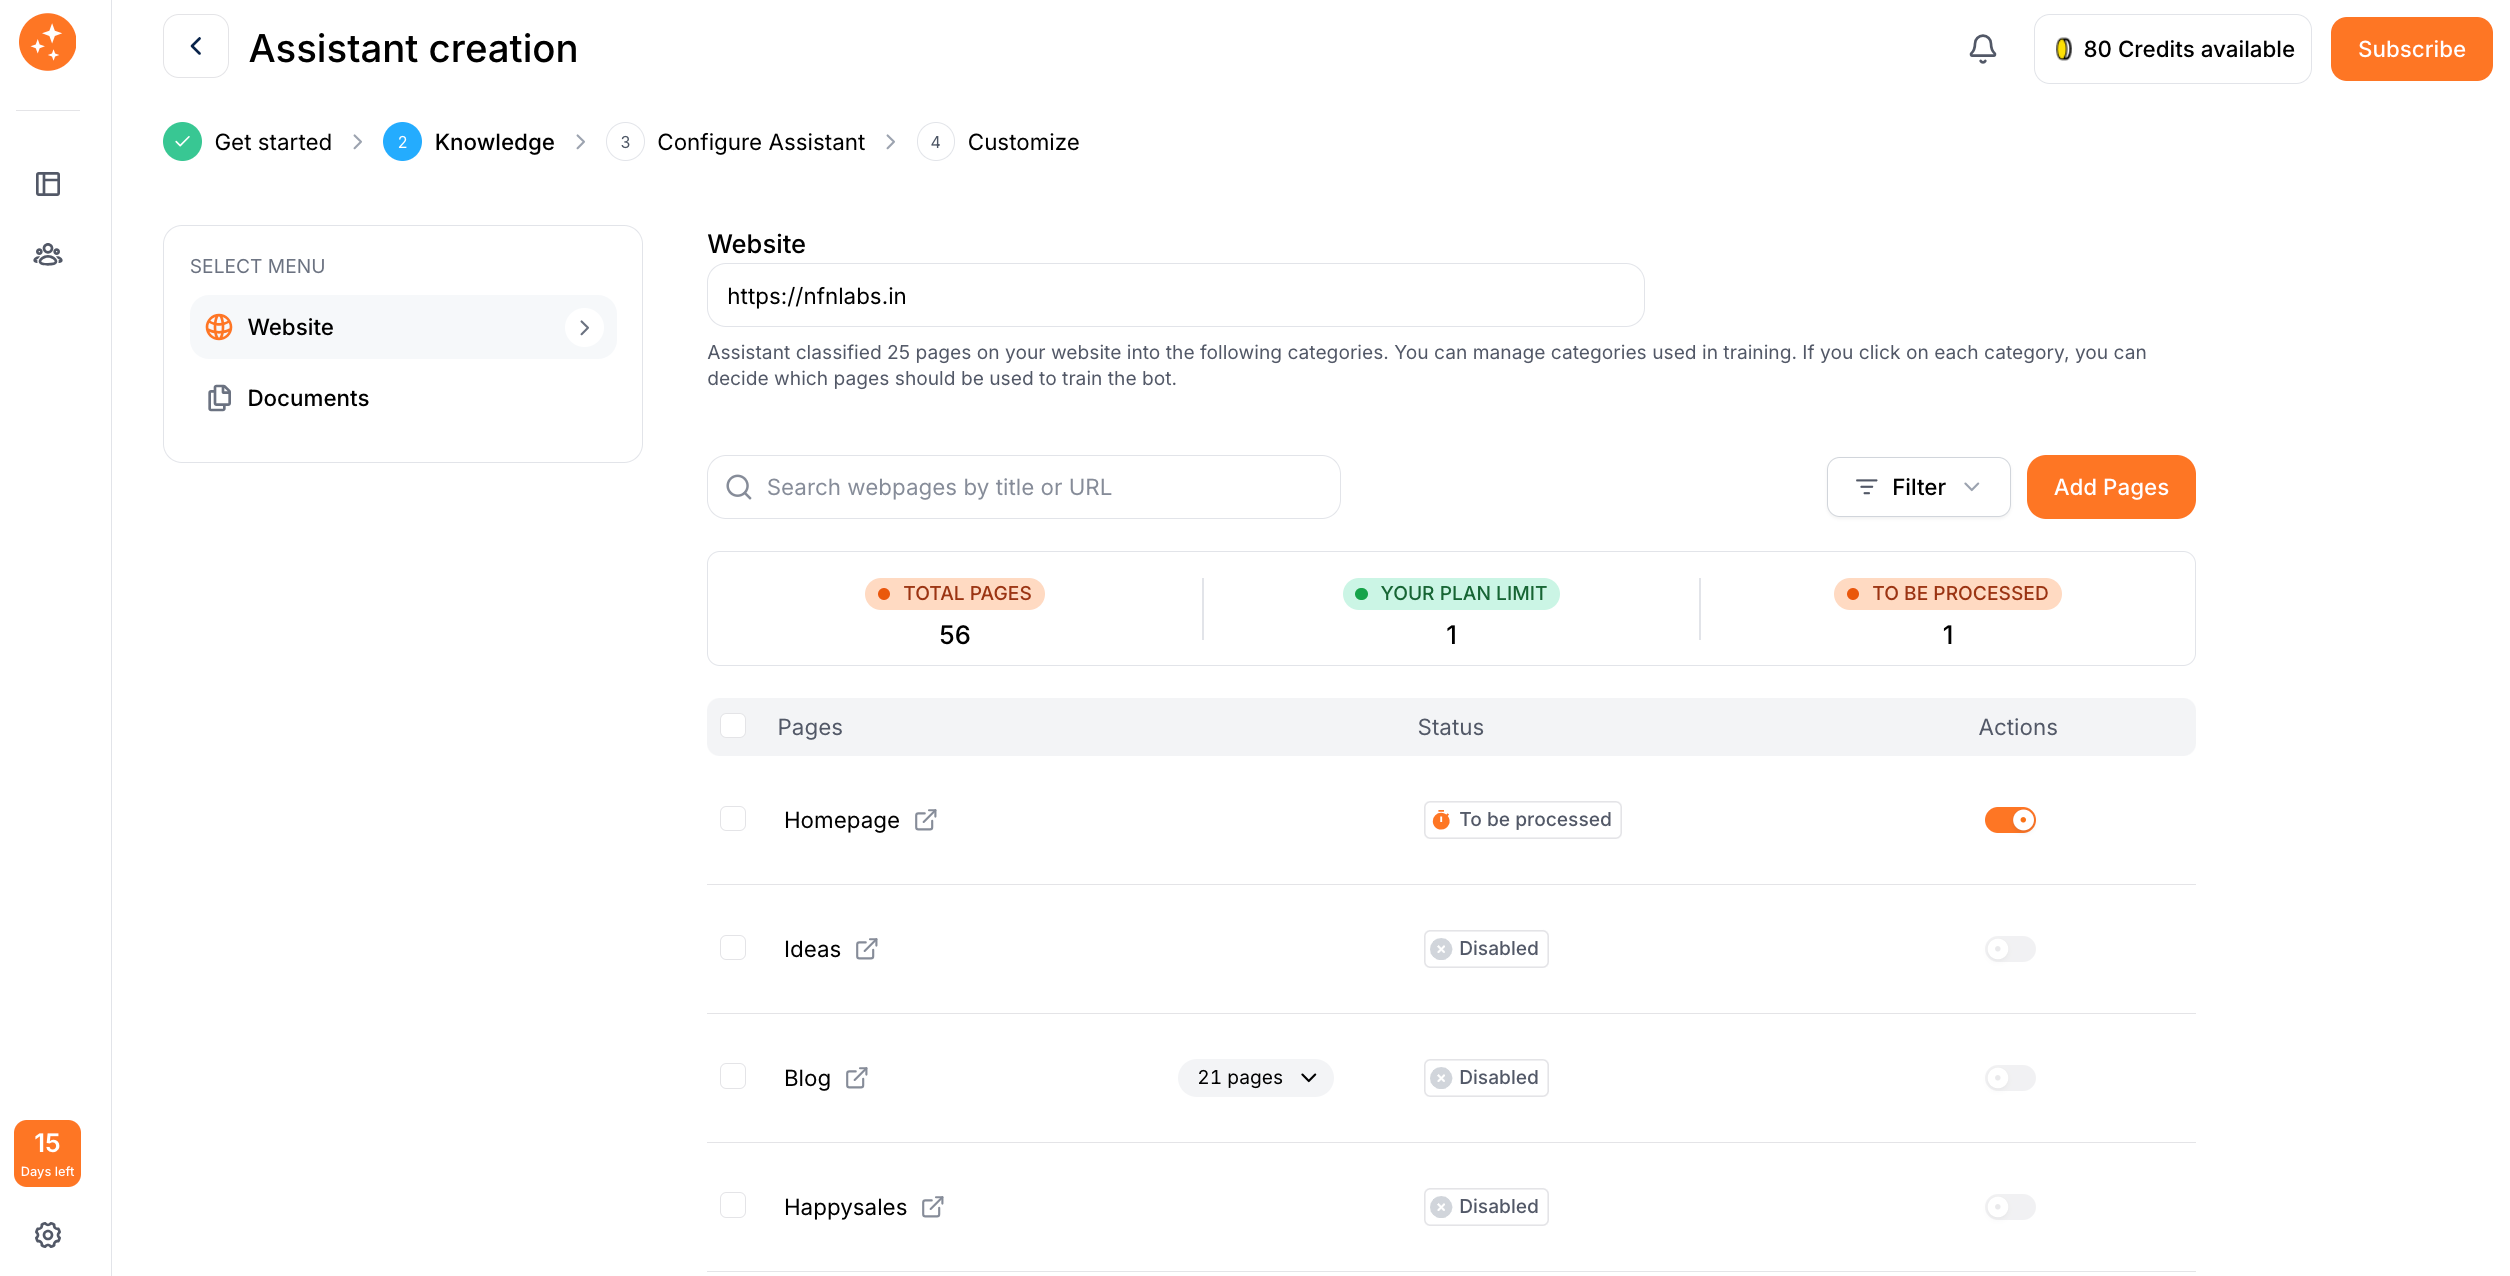
Training your bot means giving it the knowledge it needs to answer questions accurately. With WebsiteChat, you can easily do this by adding your website’s URLs and PDF documents as the bot’s information sources. For example, you might provide the URLs of your FAQ page, product documentation, or blog articles so the AI can learn from them. The platform will automatically crawl those links and extract the text content for the chatbot to learn. You can upload PDF files – for instance, user manuals or company brochures – to further enrich the bot’s knowledge base.
After you’ve added your content sources, the application will map out the information. You’ll often see a list of the pages or documents you provided. Take a moment to review this list and select or deselect specific pages if needed. For example, you might exclude irrelevant pages like your website’s terms of service if you don’t want the bot giving legal info. This ensures your bot stays focused on the right knowledge.
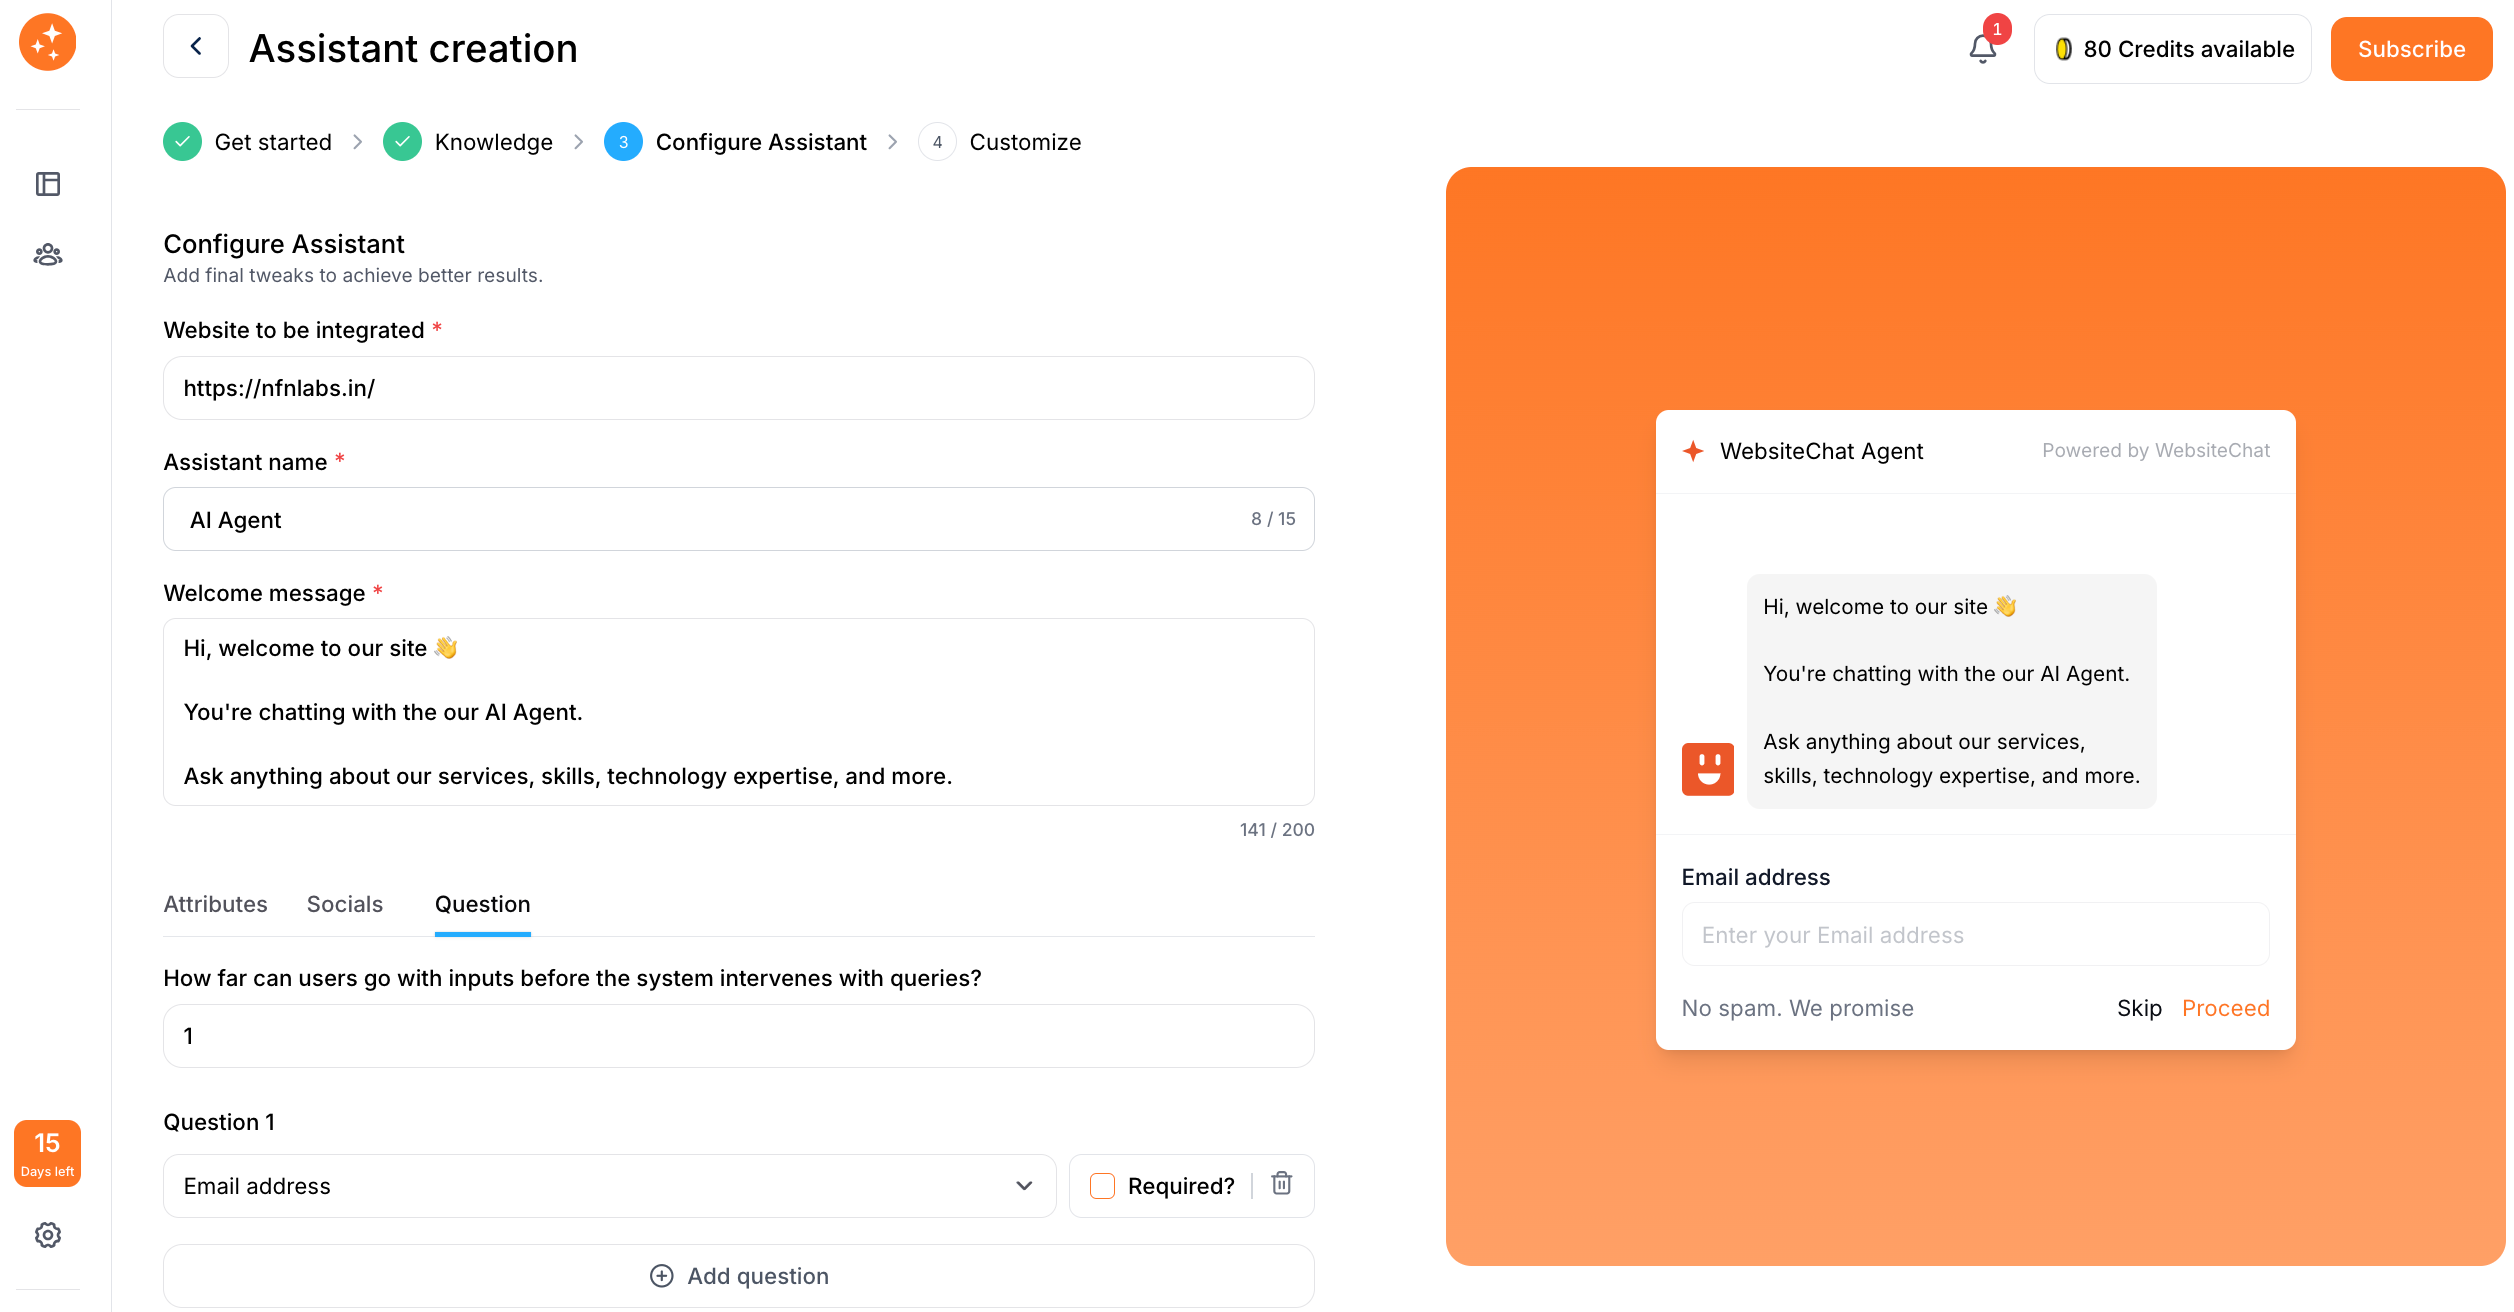
Step 2: Configure Essential Settings (Website, Assistant Name, and Lead Capture)
With your bot’s brain in place, it’s time to configure the settings that control how and where it operates. Think of this step as setting the ground rules and personality for your new AI assistant.
Website Domain Authorization: First, specify which website your chatbot is allowed to live on. The chatbot will then only function when embedded on that domain. If someone tried to use your bot on another site, it wouldn’t work, keeping your content secure.
Assistant Name: Next, give your AI chatbot a friendly identity! Choose a name for your assistant – it could be something like “AskWidget”, “Help Bot” or a persona that matches your brand (e.g. “ChefBot” for a recipe site). This name will typically appear at the top of the chat window and in greetings, so make it welcoming and on-brand. A personal touch here can make the chatbot feel more approachable to users.
Welcome Message: Craft a warm welcome message that the chatbot will greet visitors with. This is the first thing users see when they open the chat, so it should be inviting and clear. For example, “Hi there! I’m Ava, the AI assistant. Ask me anything about our products or services.” A good welcome message sets expectations about what the bot can help with. You can also include a friendly prompt, like “How can I assist you today?” Keep it short and cheerful.
Company Info and Social Links: You can add business profile details that the AI can reference if asked. There are fields for your company name, your social media handles, address, etc. Fill these in, especially if such info isn’t already present in the knowledge you uploaded. That way, if a user asks “Where are you located?” or “What’s your Twitter handle?”, the bot can respond accurately. This is a quick step that makes your bot smarter about your specific business.
Lead Capture Questions: Perhaps one of the most powerful features for website chatbots is the ability to capture leads. You can set up the bot to ask the visitor for their name, email, phone number or location during the conversation. These fields help you identify who your website visitors are and follow up with potential customers. In this configuration step, decide which questions to ask and when. For instance, you might configure the chatbot to request the user’s name and email after it has answered a couple of their questions. Many businesses find it effective to trigger lead capture after 2-3 interactions – the visitor has gotten some value, and the bot then asking contact information. You also get to choose whether each question is mandatory or optional. Marking a question as mandatory means the chatbot will insist on an answer before proceeding. Use this sparingly; for example, you might require an email for follow-up but make the phone number optional. This ensures that the chatbot doesn’t immediately bombard visitors with contact information, but also doesn’t chat endlessly without ever trying to get a lead.
All these configuration options help tailor the chatbot’s behavior to your goals – whether that’s capturing leads, providing support, or both.
Take a moment to double-check all these settings. You’ve now defined where your bot works, who it is, how it greets people, and what info it should collect. With the groundwork laid, we can move on to styling the chatbot to fit your website’s look.
Step 3: Customize the Chatbot’s Appearance (Branding and Theme)
One big advantage of modern chatbot widgets is that you can completely customize their look and feel to match your website’s branding – all without coding. In this step, you’ll choose colors, themes, and other style options so the chat widget looks like an integrated part of your site (and not a generic add-on).
WebsiteChat offers a customization menu where you can adjust things like:
Theme (Light or Dark): Decide whether the chat window should use a light theme (white or pale background with dark text) or a dark theme (dark background with light text).
Chat Widget Position: Choose where the chatbot will appear on your site. Common positions are bottom-right corner (the most typical), or bottom-left. The bottom-right corner is popular because it’s prominent yet unobtrusive. Pick the spot that makes sense for your site’s layout and doesn’t cover any important content.
Header Text: Customize the text in the header of the open chat window. This could be something like “Chat with [Assistant Name]” or “Welcome to [Your Company] Chat”. If you named your assistant in Step 2, you might want the header to show that name. Some businesses put a friendly tagline here, for instance: “Ask me anything!” Keep it on-brand and welcoming.
Font Style and Size: WebsiteChat let you either choose from a list of fonts or pick your website’s font for consistency. If maintaining your site’s typography is important for branding, choose the option to use your website’s default fonts. Also check if the text size is readable; you might be able to increase or decrease the font size. Accessibility matters – you want the chat text to be easily legible for all users.
Bot Avatar and Logo: Confirm that the bot’s profile picture or avatar is set to what you want (a friendly robot icon, your logo, etc.). It’s another opportunity to remind users they’re chatting with your brand’s official assistant.
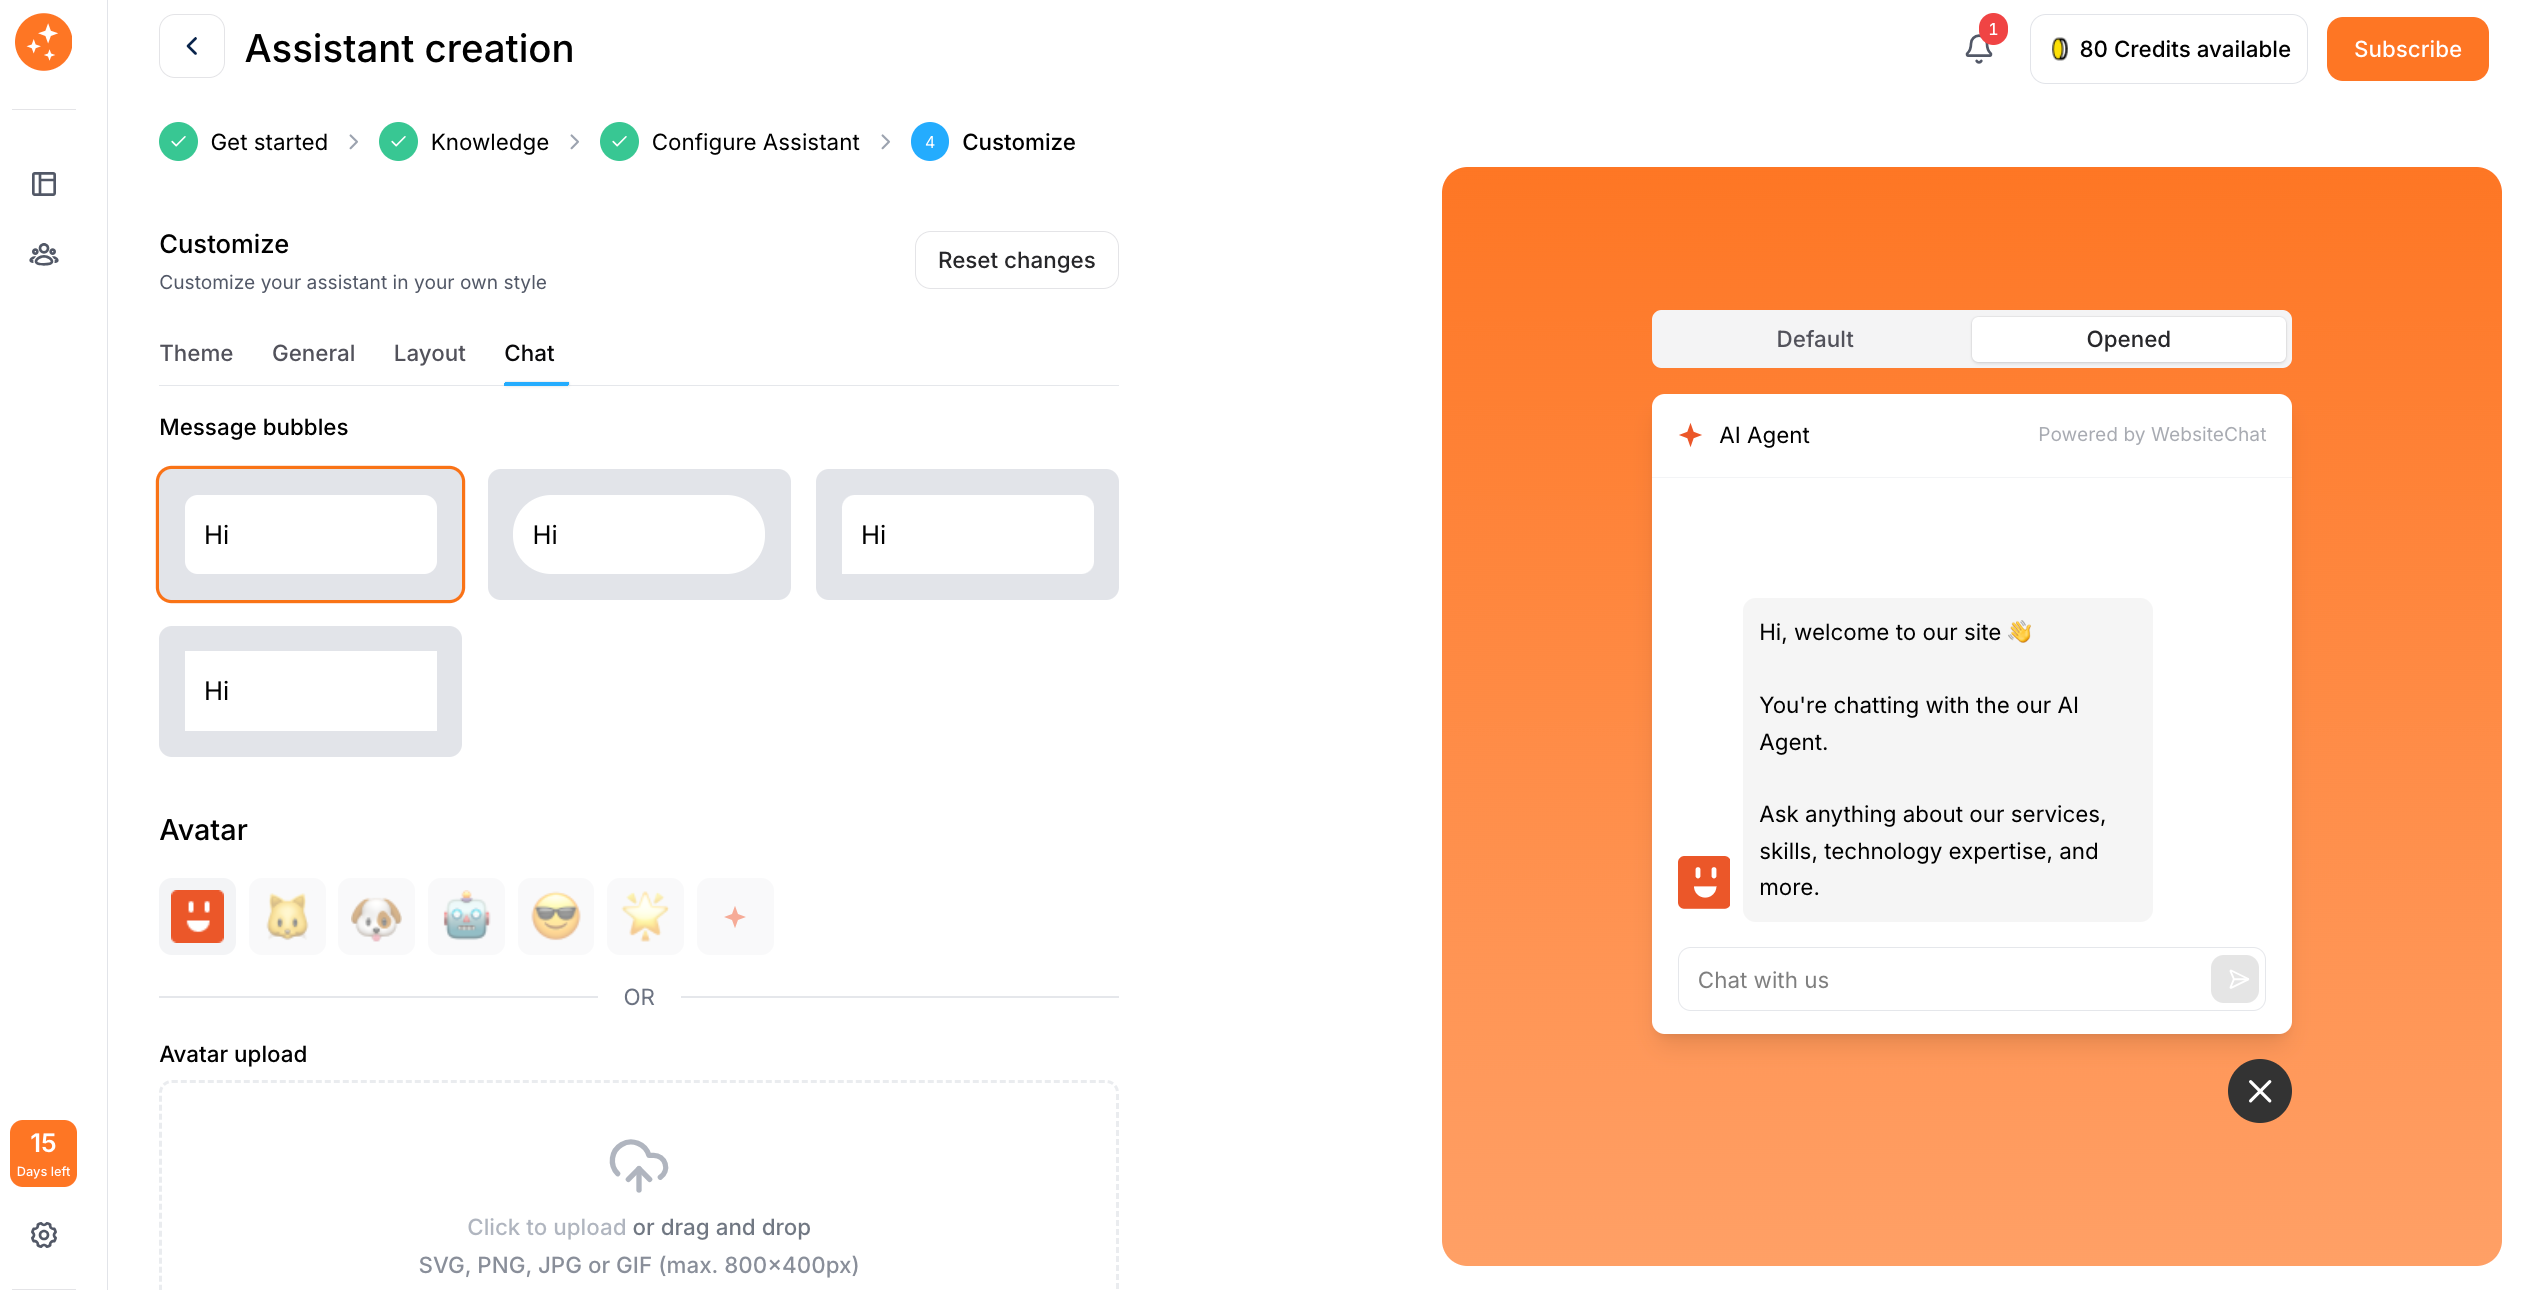
All these customization options allow you to design the chatbot interface to seamlessly blend into your site’s design. Spend a few minutes in this section of the builder tweaking the settings. It’s usually an instant preview – as you change the layout or text, you’ll see the preview of the widget update. Aim to make the chatbot window look like it “belongs” on your site.
By the end of this step, your chatbot should not only be smart and properly configured, but also easy on the eyes and on-brand. A well-designed chat widget encourages more visitors to click and engage (remember, 80% of users will use a chatbot if it’s clearly offered – so making it visible and attractive helps). Now, before we put it on your site, let’s ensure the content is ready to go.
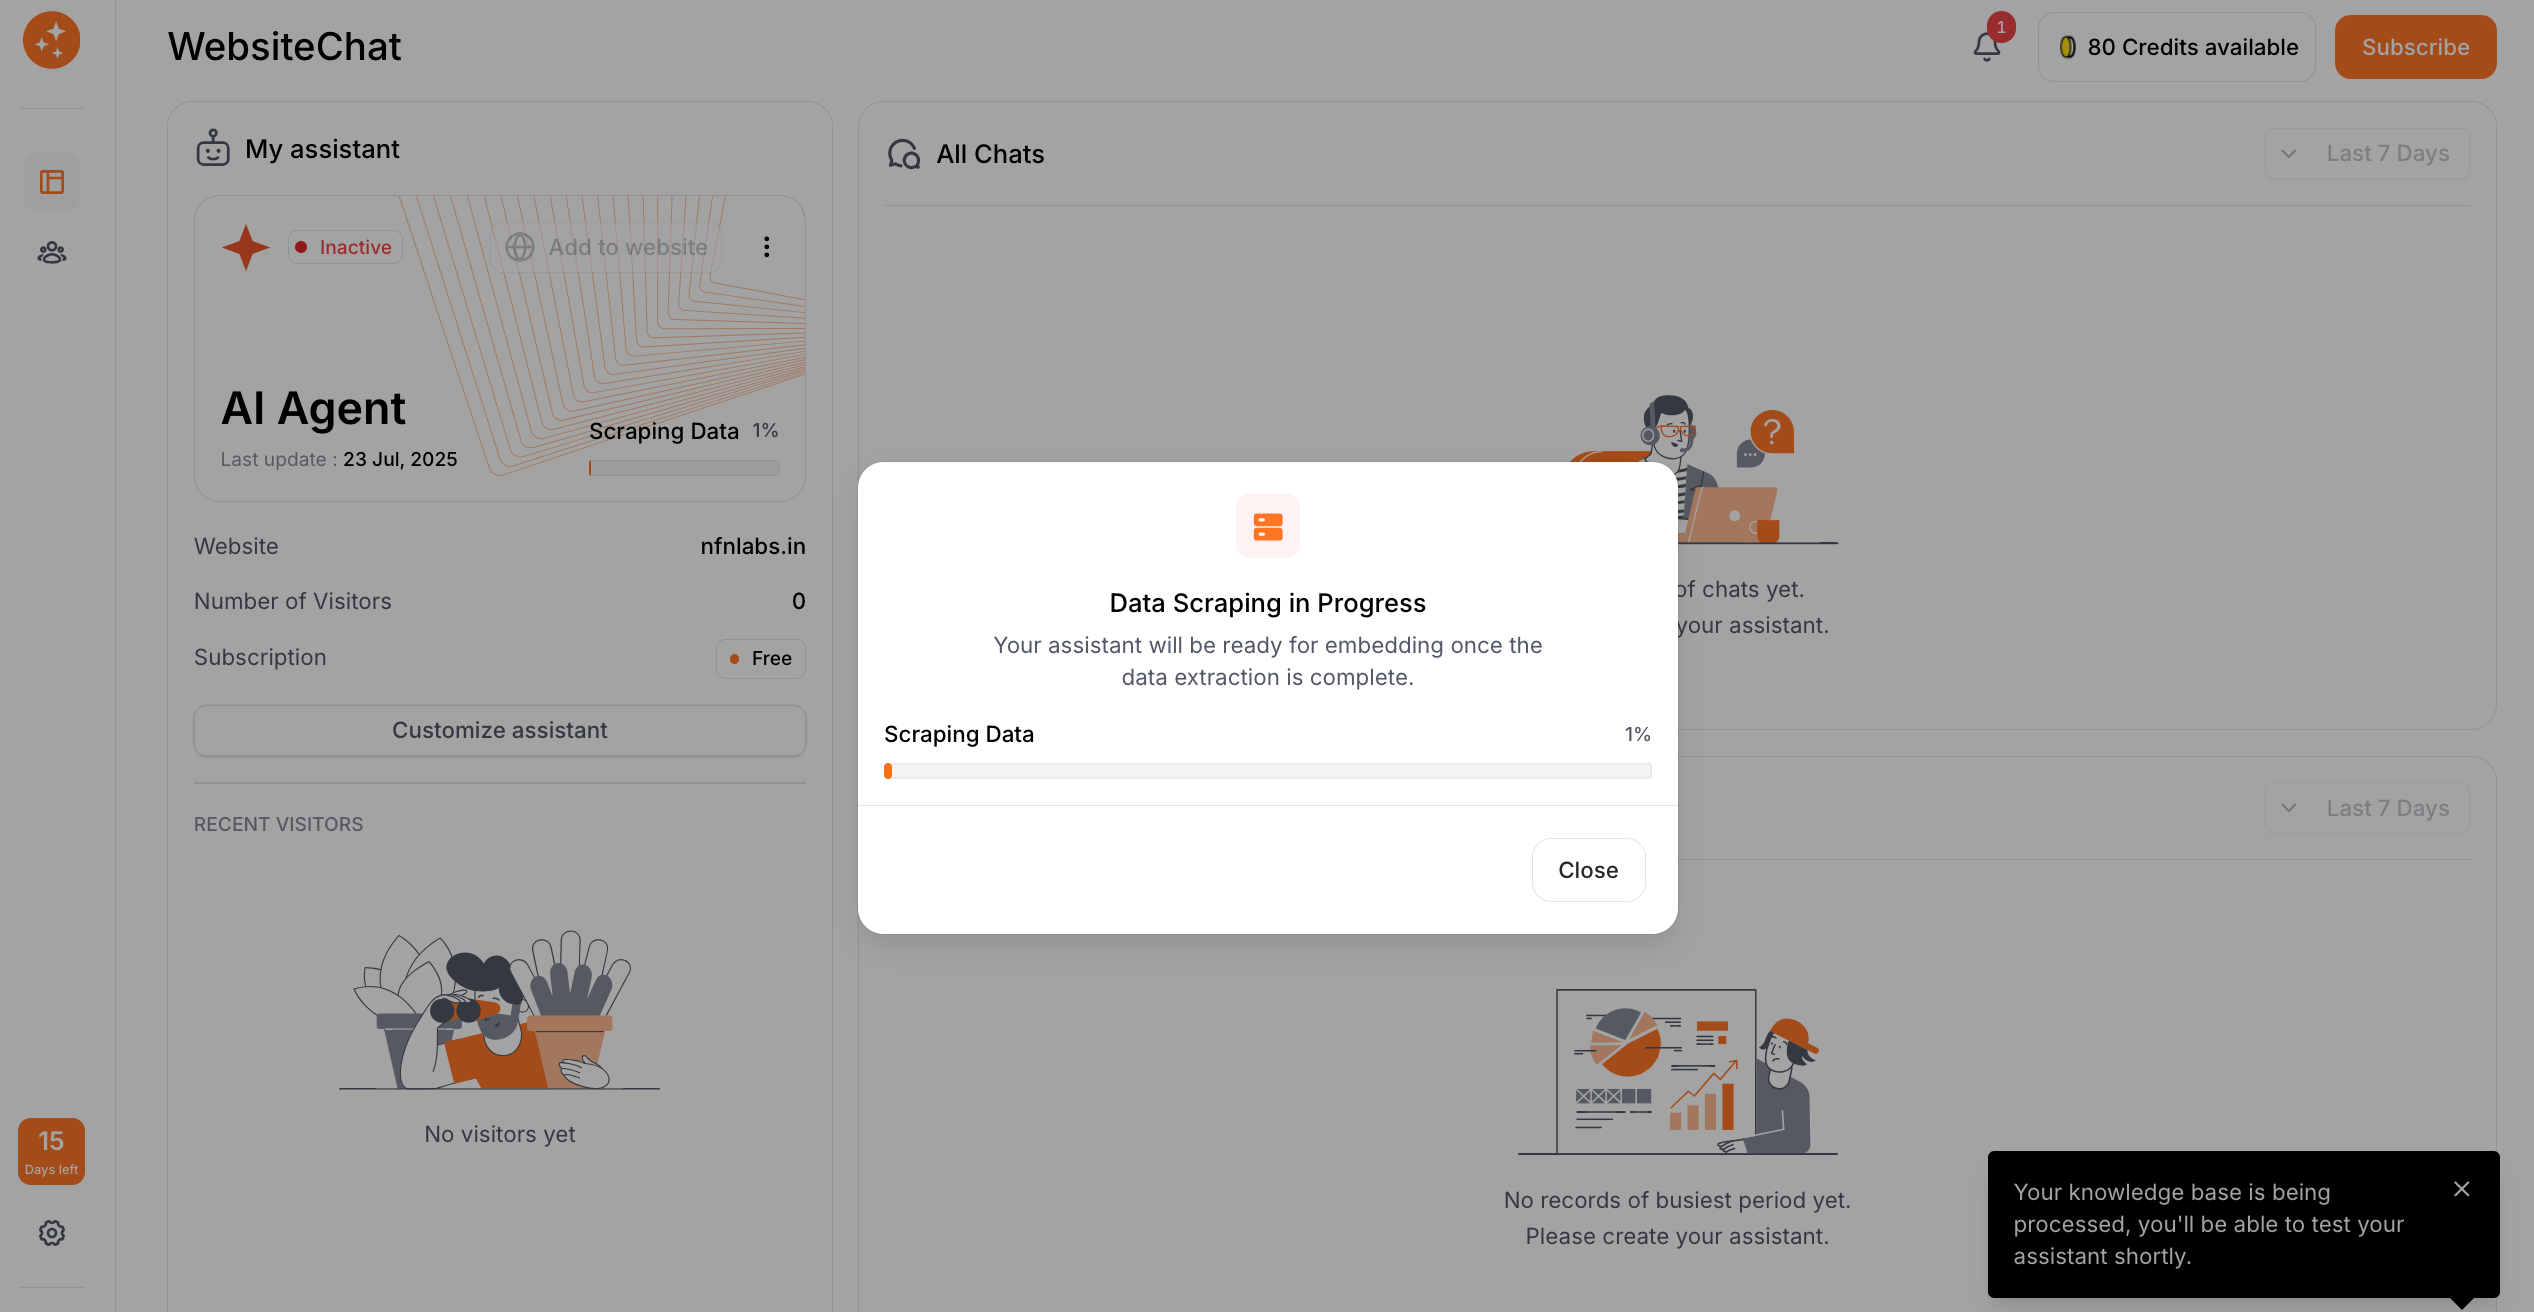
Step 4: Allow the AI to Build the Knowledge Base
This step is a bit of a waiting game, but an important one – the knowledge base creation. Depending on the size of your website or documents, the AI may still be busy getting trained. Here’s what to expect and how to handle it:
Indexing Time Estimates: For a small website (say, a few pages or under a dozen FAQs), the process can be pretty quick – often under 5 minutes. However, for larger sites (100+ pages) or if you uploaded a big batch of documents, it’s normal for this process to take longer. You might be looking at anywhere from 30 minutes to an hour or more for very large knowledge bases. WebsiteChat, shows a progress bar or status indicator like “60% completed” to keep you updated.
Troubleshooting: If there is an error in the processing (perhaps due to a broken link or a PDF that couldn’t be read), the platform flags it. In such cases, you can remove or replace those sources and start the indexing again for them. Fortunately, this is rare – most public website pages and standard PDFs are ingested without a hitch.
In summary, be patient and ensure the AI has finished building the knowledge base before moving on. This step is what gives your chatbot the ability to answer questions accurately. Once you’ve got the “all clear” that training is complete, it’s time for the exciting part: seeing your chatbot in action!
Step 5: Preview and Test Your Chatbot
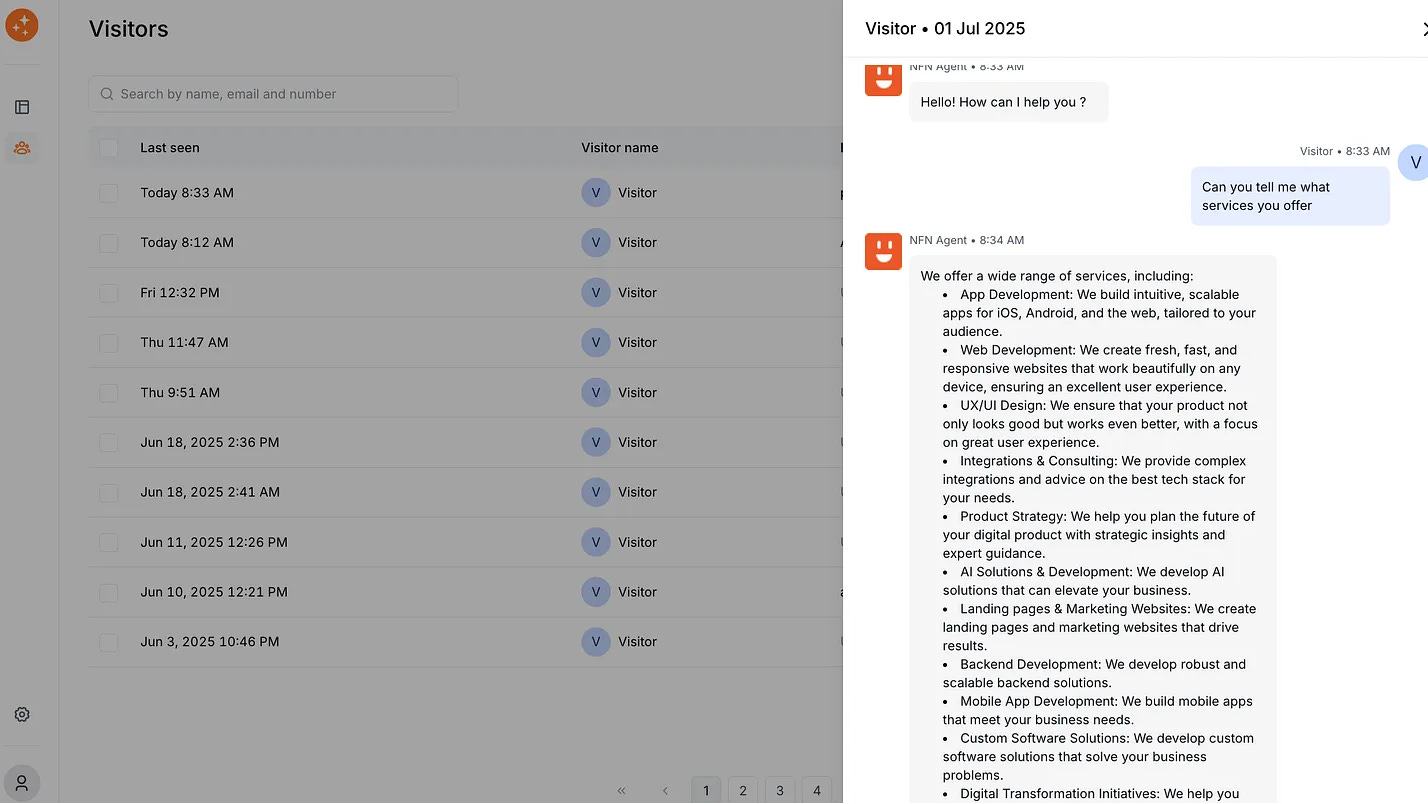
Before unleashing your new AI chatbot on real website visitors, it’s wise to take it for a test drive. WebsiteChat includes a built-in preview mode so you can chat with your bot directly from the dashboard. This is your chance to verify that it understands your content and behaves as expected.
The welcome message should appear, and you can interact just as a user would on your site.
Here are some tips for testing your chatbot effectively:
Ask Common Questions: Think of the top questions your customers or visitors usually have. This might include things like pricing queries, product details, shipping information, service hours, etc. Type those questions into the chat and see how the bot responds. Is it pulling accurate info from the content you provided? For instance, if you ask “What is your refund policy?” and you know that’s answered on your site, check that the bot gives the correct summary or answer. The answer doesn’t have to be word-for-word from your page, but it should capture the key point. If something is off, you may need to tweak your content or add an FAQ to cover it.
Test the Limits: Try asking a question that’s outside the scope of what you trained the bot on, to see how it handles it. This tells you the bot won’t go off the rails when users ask unexpected things.
Check the Flow for Lead Capture: Remember those lead capture settings from Step 2? Now is the time to see them in action. Ask a couple of questions as if you’re a user, and observe when the chatbot starts prompting for name/email/etc. Does it align with the number of interactions you configured? For instance, if you set it to ask for email after 3 user questions, go ahead and ask 3 questions. On the 4th, you should see the bot’s prompt for email.
As you test, take notes of anything that seems off or could be improved. Most issues can be fixed by either adjusting your content (adding a missing Q&A, clarifying something in your site content) or tweaking the bot’s settings. For example, if you find the bot didn’t have an answer for a very important question, you can include it in an FAQ page or PDF and re-train. If the styling looks weird on preview, adjust the theme or font accordingly.
The goal of previewing is to catch any problems now, before real users interact with the chatbot. Once you’re satisfied that the bot is helpful, accurate, and nicely tailored to your needs, congratulations – you’re ready to put it live on your site!
Step 6: Embed the Chatbot on Your Website (No Coding Needed!)
Now for the moment of truth: adding the chatbot to your actual website. Traditionally, integrating a chat widget might have required writing code or hiring a developer, but with no-code solutions, it’s usually as simple as copying and pasting a snippet of code into your site. Don’t worry – this is not coding per se; it’s just a small script that the platform provides, and you’ll place it like you would a Google Analytics tag or any embed code.
Here’s how to get your chatbot live:
Copy the Embed Code: Look for the or “Add to website” button. Clicking this will reveal a piece of code, often a JavaScript snippet. It might look like a few lines of code starting with
<script ...> ... </script>. Don’t worry about what’s inside; you just need to copy it to your clipboard.Paste into Your HTML: Next, open your website’s code or CMS (Content Management System). You’ll need to paste the snippet into your site’s HTML so that it loads on every page (or at least on whatever pages you want the chatbot to appear). Most CMS platforms like WordPress, Wix, Squarespace, etc., allow you to add custom scripts site-wide.
Verify on the Live Site: After adding the code, save your changes and go to your website as a visitor. You should now see the chatbot widget icon (e.g., the chat bubble) at the position you chose, usually in the bottom corner. If it doesn’t show up, try refreshing the page or clearing cache. It can take a few seconds to load on first try. Once visible, click the widget to open it and ensure everything looks good – the welcome message appears, the customization is correct, and you can send a test message to see if it responds. Since you already tested in preview, there shouldn’t be surprises, but it’s always satisfying to see it working on the real site!
No Code, No Problem: It’s worth emphasizing how simple that was. You didn’t have to write any code or build a chat server – the platform handles all of that on their end. The snippet you added is basically a hook that calls the chat widget from the service and attaches it to your webpage. This “no coding required” approach democratizes chatbot deployment, meaning anyone can add an AI chatbot to their website in minutes. If you ever need to disable the chatbot, you can just remove that snippet from your site or deactivate it from the web app, and the widget will no longer load.
Before moving on, double-check a couple of things on your live site’s chatbot:
Does the chatbot open on both desktop and mobile? (Resize your browser or check on your phone to ensure the chat icon is accessible on smaller screens.)
Is it on all the pages you want? If you only inserted the code on a template or specific pages, confirm it’s present where it should be.
If your site has a content security policy, ensure it allows the chatbot script to load (most likely fine by default, but something to be aware of in advanced setups).
Great job! You’ve now successfully embedded an AI chatbot on your website, and it required zero custom programming. But adding the chatbot is just the beginning – to get the most value, you’ll want to keep an eye on how it’s performing. That’s where the next step comes in.
Step 7: Monitor Your Chatbot’s Performance and User Activity
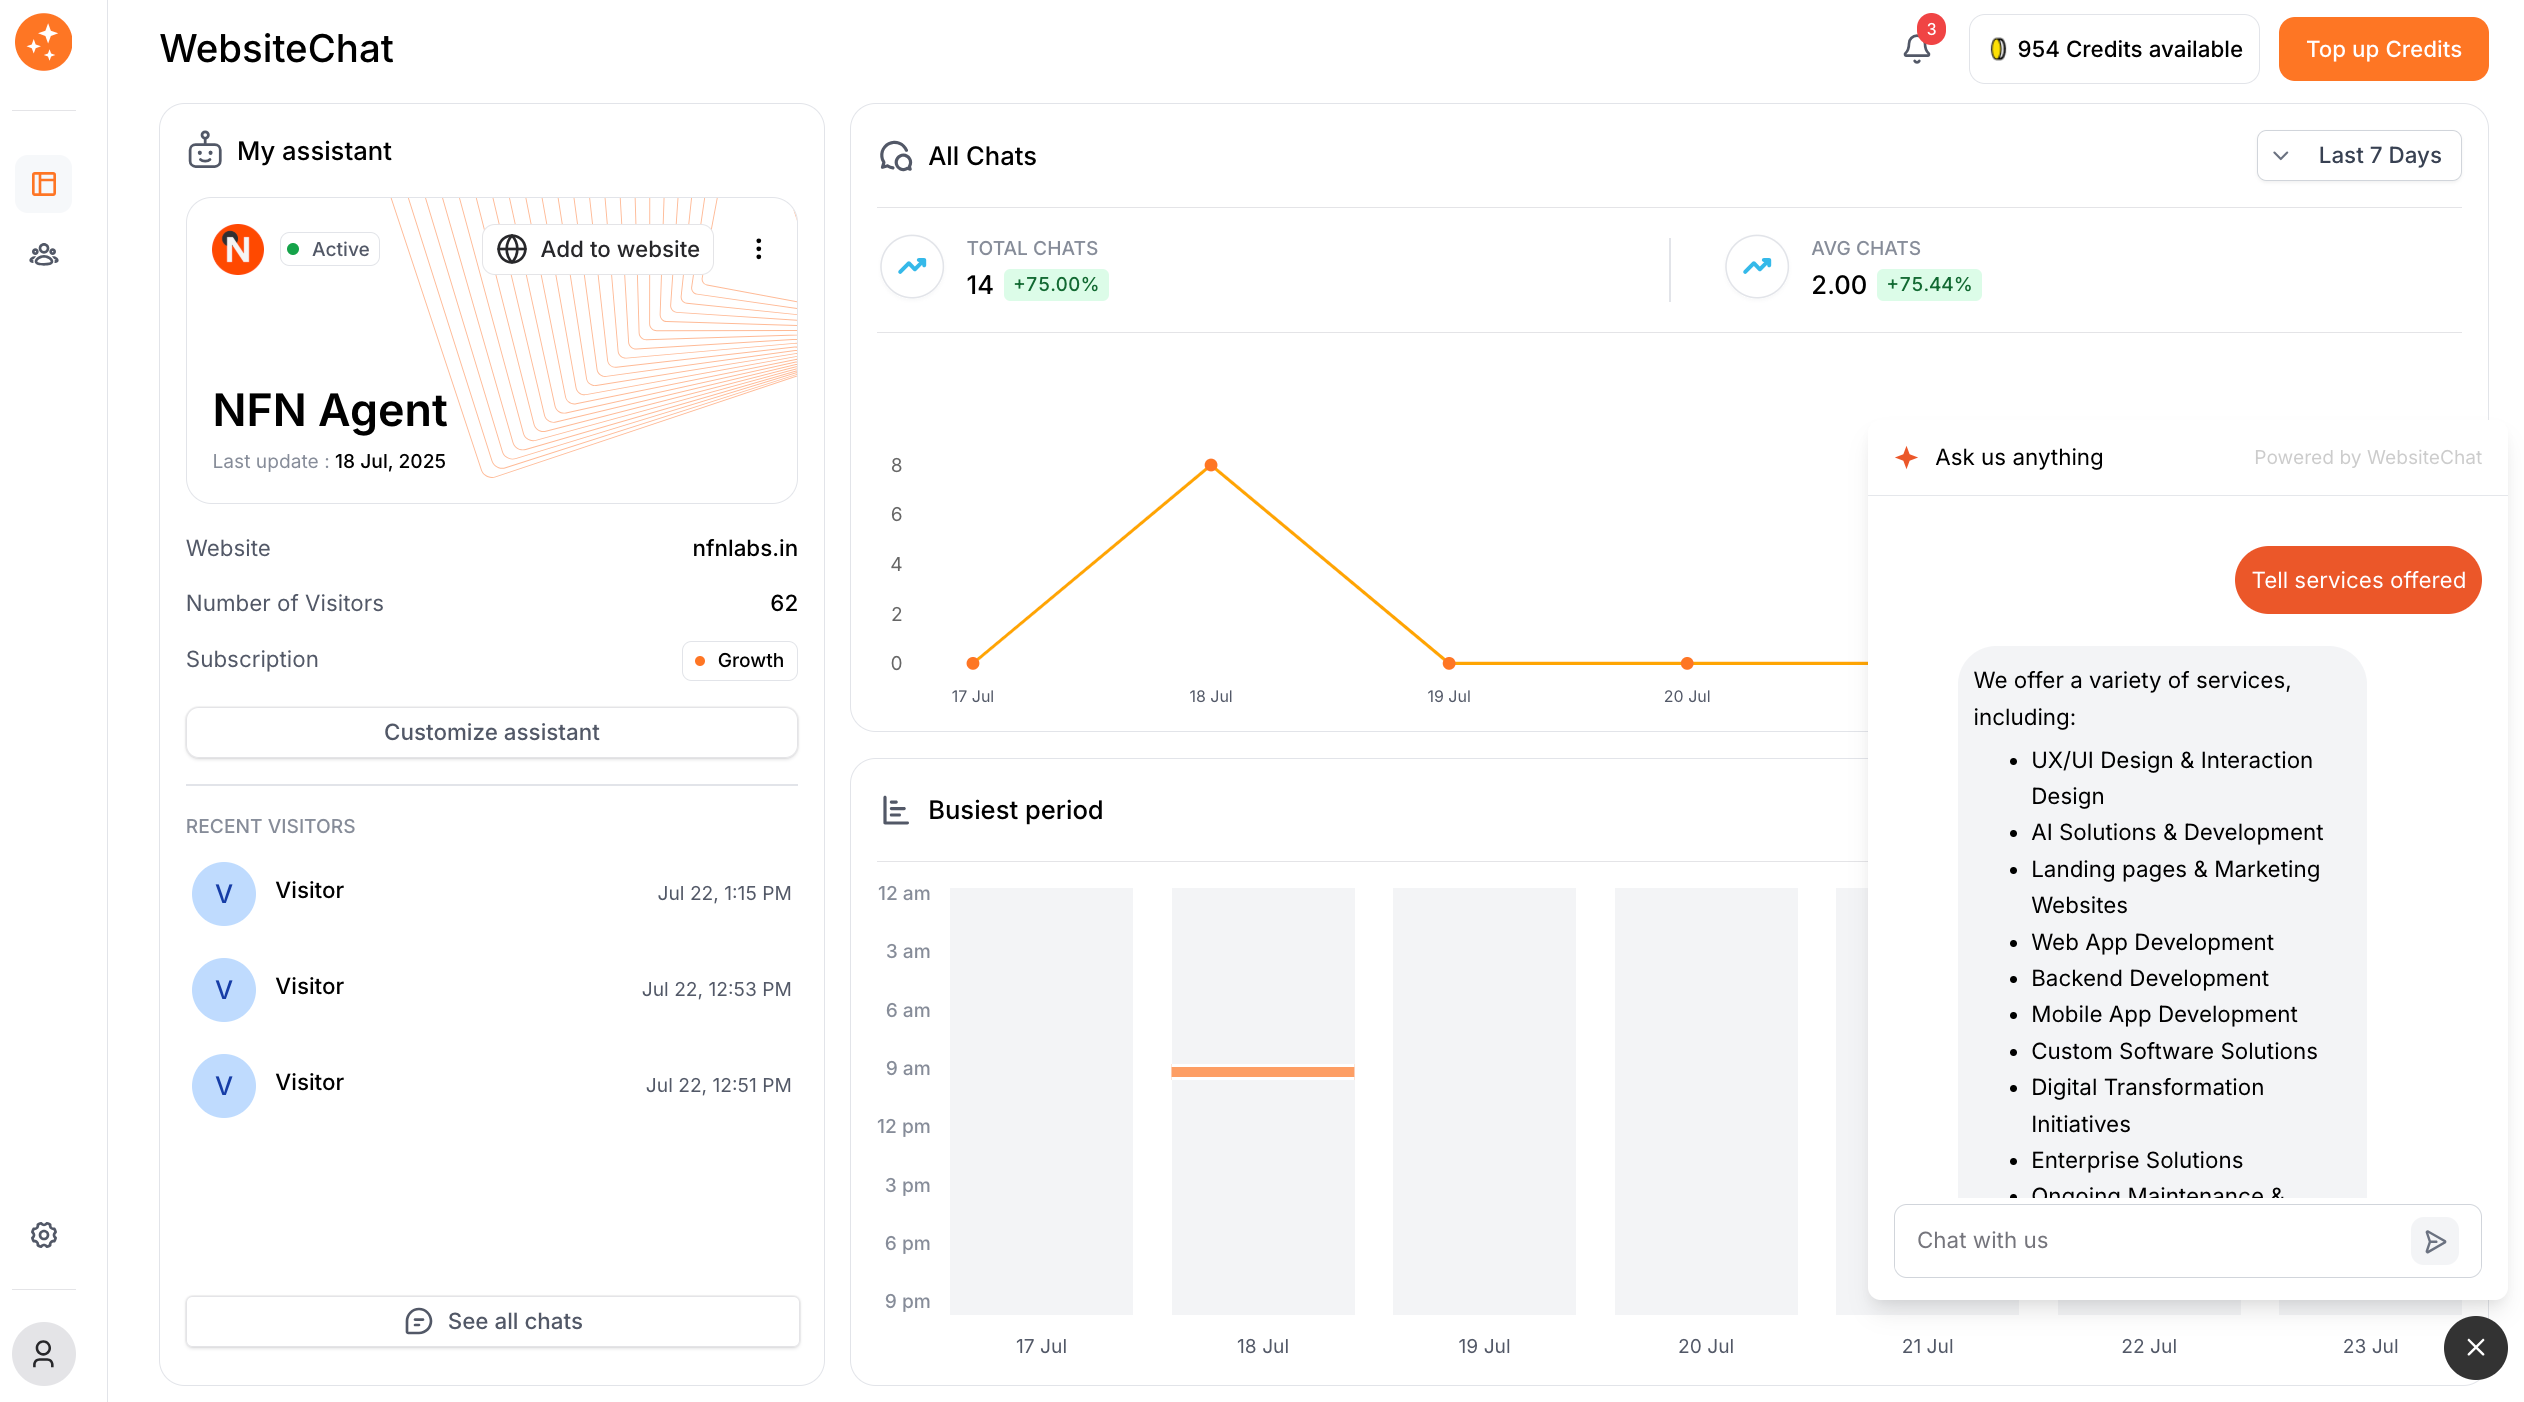
Once your AI chatbot is live, it will immediately start engaging with visitors — answering questions, collecting leads, and so on. To make sure it’s doing a good job (and to glean insights from it), you should regularly monitor its performance through the dashboard’s analytics or reporting features. WebsiteChat provides a dashboard of metrics and conversation logs that you can use to evaluate and improve your chatbot over time.
Here are key things to monitor:
Number of Chats: Check how many chats your bot is handling per day or per week. This shows you the volume of engagement. If you suddenly see a spike in chats on a particular day, that might correspond with a marketing campaign or a seasonal traffic boost. For instance, you might discover that on Mondays you get double the chats compared to other days – perhaps because people have questions after using your product over the weekend.
Busiest Periods (Peak Times): Most analytics will highlight what times of day or which days of the week have the most chatbot activity. You might find, for example, that chat usage peaks around 3-5 PM, or that weekends have more chats than weekdays. These trends are gold for understanding user behavior. If you know the busiest periods, you can plan human backup support if needed, or schedule updates or announcements during those times. Also, it’s a satisfying confirmation that your bot is effectively covering off-hour queries if you see lots of chats at 2 AM (when no human would be available). Remember, one huge benefit of chatbots is providing instant answers whenever the user needs – which contributes to higher customer satisfaction.
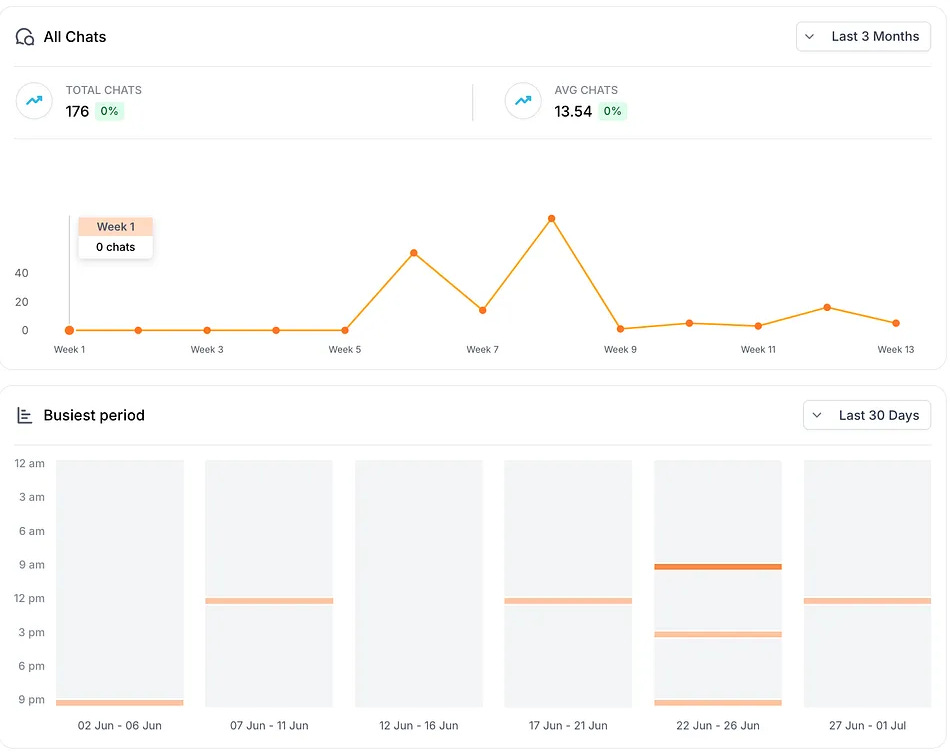
WebsiteChat make monitoring easy with clear charts and logs. Make it a habit to check your chatbot dashboard at least weekly. By staying on top of the data, you can ensure your AI assistant is continuously improving and delivering a great experience.
Speaking of improvement, let’s move to the final step, which is all about learning from those conversations and taking action.
Step 8: Use Conversation logs to Improve and Update Your Chatbot
Your AI chatbot isn’t a “set it and forget it” tool – the real magic comes from iterative improvement. Now that it’s live and you’re monitoring it, you’ll gather a wealth of information from actual user conversations. In this final step, we’ll cover how to leverage those insights to make your chatbot (and your business) even better.
Identify Content Gaps: As you analyze the logs, make note of questions the bot couldn’t answer well. Are there topics coming up that you never provided information on? For instance, if users frequently ask about a certain integration or a feature you haven’t documented, consider updating your knowledge base. That could mean uploading a new support article, adding a section to your FAQ page, or directly feeding that info into the chatbot’s data. Keeping the bot’s knowledge updated is crucial – your business information might change (new pricing, new policies, etc.), and user queries might evolve. Treat the bot’s knowledge base as a living document that grows over time.
Lead Capture Stats: If your chatbot is asking lead capture questions, monitor how that’s going. How many users are providing their email or phone number? What’s the drop-off rate? For instance, if 100 chats happen and 30 of those lead to an email capture, that’s a good 30% conversion of engaged visitors to leads.
Follow Up on Lead Captures: Remember those leads the chatbot has been collecting? Don’t let them go cold. Your dashboard should list out the contacts (name, email, etc.) the bot gathered along with possibly the context (what they were asking about). Reach out to those leads in a timely manner. For example, if someone was asking about pricing and provided their email, you can follow up with a personalized note: “Hi [Name], I saw you were chatting with our assistant about pricing. I wanted to reach out personally to see if you have any further questions or need help choosing a plan.” This kind of proactive follow-up can turn an interested visitor into a satisfied customer.
Error Rate/Fallbacks: Also look at how often the bot says it doesn’t know an answer or fails to provide a confident response. An occasional “I’m not sure about that” is normal (no bot is omniscient), but if you see it frequently, it might mean your knowledge base is missing key information or that users are asking things outside the bot’s scope. Identify those gaps and consider updating the bot’s training content to fill them.
Monitoring isn’t just about catching issues – it’s also about discovering opportunities. For example, if you notice many users ask about a product that’s out of stock, that’s a signal for your sales or inventory team. Or if tons of people are asking for a feature your service doesn’t have, that’s valuable product feedback. In essence, your chatbot becomes a 24/7 listening tool for customer needs.
With these steps, your chatbot will not stagnate but instead evolve with your business and your audience’s needs. You’ve effectively added a tireless virtual team member who gets smarter every week – pretty amazing, right?
Thanks for reading our blog! Subscribe for free to receive new posts and support our work.
Conclusion: Embrace the No-Code Chatbot Revolution
By following this guide, you’ve seen firsthand that adding an AI chatbot to your website in 2025 is not only possible without coding, it’s downright straightforward. This AI helper can answer questions instantly, capture valuable leads, and give your visitors the 24/7 support they expect in today’s fast-paced digital world.
Keep your bot up to date, watch it interact, and don’t be afraid to get creative with how your chatbot can serve your audience.
P.S. If you’d like to see a live demonstration of these steps, we’ve got you covered. Check out our video demo or write to us to schedule an onboarding call. Seeing it in action will reinforce just how easy it is to get your own AI chatbot up and running. Happy chatting!